WAREHOUSE LICENSING
ON ICEGATE 2.0
USER MANUAL
Date : 14th November 2025
Table of Contents
1. Getting Started......................................................................................4
2. Brief about User Manual........................................................................4
3. How to Start...........................................................................................5
4. Warehouse Licensing and/or MOOWR/MOOSWR Registration Process.6
4.1 Fresh Registration Process...................................................................6
4.1.1 Select Warehouse Licensing Role.........................................................7
4.1.2 Enter GSTIN Number............................................................................7
4.1.3 Select Role Detail................................................................................8
4.1.4 Verification of User Details....................................................................8
4.1.4.1 Verification of Mobile Number.............................................................9
4.1.4.2 Verification of Email ID......................................................................10
4.1.5 Generation of Reference ID...................................................................11
4.1.6 Process for Role Registration................................................................12
4.1.6.1 Proceeding to Role Registration..........................................................12
4.1.6.2 Role Registration Form......................................................................13
4.1.6.2.1 For Existing Warehouse User..........................................................15
4.1.6.2.2 For Applying a New Warehouse.......................................................19
4.1.6.3 Form Submission.............................................................................. 27
4.2 Continue using Reference ID.....................................................................28
4.2.1 Verification of Reference ID....................................................................28
4.2.2 Verification of Details using Mobile Number.............................................29
4.2.3 Verification of Details using Email-ID.......................................................31
5. Track Query Status and Reply....................................................................32
6. Digi Locker Validation in the Warehouse Licensing Module......................36
7. Contact Us...................................................................................................37
1. Getting Started
Welcome to the user manual of ICE-GATE 2.0 'Warehouse Licensing' & MOOWR (Manufacturing and Other Operations in Warehouse Regulations) / MOOSWR (Manufacturing and Other Operations in Special Warehouse Regulations) Registration functionality. The manual offers a detailed account of all the features incorporated in the functionality and explains the steps involved in completing the processes regarding 'Warehouse Licensing and Registration for MOOWR/MOOSWR' on ICE-GATE 2.0.
2. Brief about User Manual
(a) Purpose:
The user manual is designed to provide step by step illustration of all the steps that are involved in the Warehouse Licensing under section 57, 58, 58A & MOOWR/MOOSWR Registration under section 65.
(b) Intended Audience:
This user manual is intended for use by all the Warehouse Licensees users who wish to avail of Warehousing services of the ICEGATE portal.
3. How to Start
(a) Please follow the steps enumerated for obtaining a new warehouse licensing and/or MOOWR/MOOSWR Registration on ICE-GATE portal.
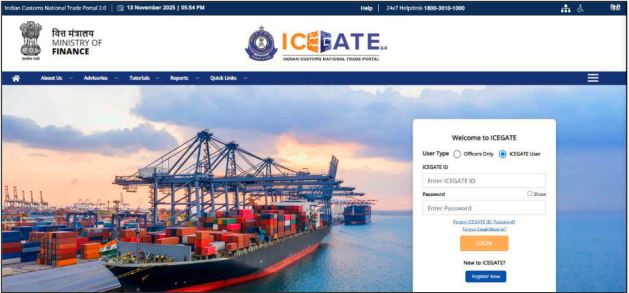
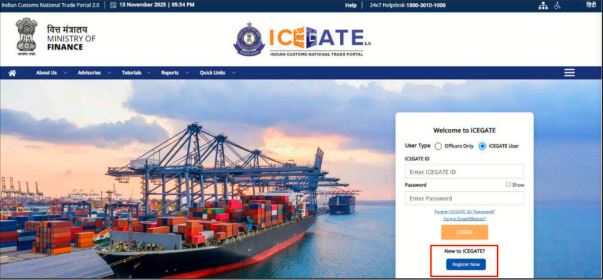
(b) For Warehouse Licensing registrations, and/or MOOWR/MOOSWR Registration, click on the <Register Now> button outlined in red as shown in the screen below.
4. Warehouse Licensing and/or MOOWR/MOOSWR Registration Process
(a) The warehouse licensing application process has five key sections that are as follows:
i. Role Selection
ii. Verification of GSTIN Details
iii. Verification of User Details
iv. Verification of Mobile and Email address
v. Filling and Submission of the Role Registration Form
(b) These sections are divided into simple steps and are explained below.
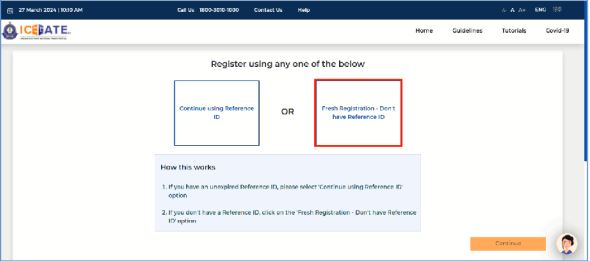
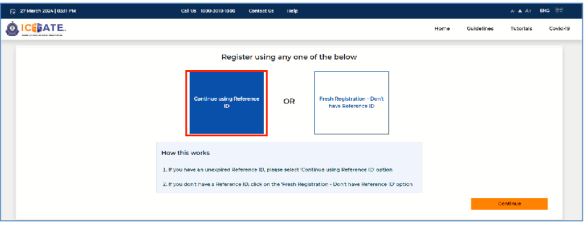
4.1 Fresh Registration Process
(a) For new/ fresh warehouse licence and/or MOOWR/MOOSWR Registration where Reference ID is not generated, the user should click on the 'Fresh Registration - Don't have Reference ID ' option.
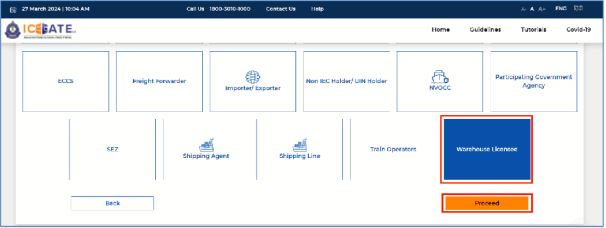
4.1.1 Select Warehouse Licensing Role
(a) On clicking the <Continue> button, the system will display the set of options from which from which the user can select the requisite Warehouse Licensee Role and then he/she should click on the <Proceed> button.
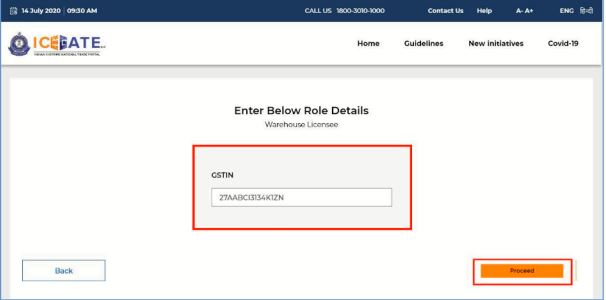
4.1.2 Enter GSTIN Number
(a) Enter GSTIN number and click on the <Proceed> button. The user can go back to the previous page by clicking on the <Back> button.
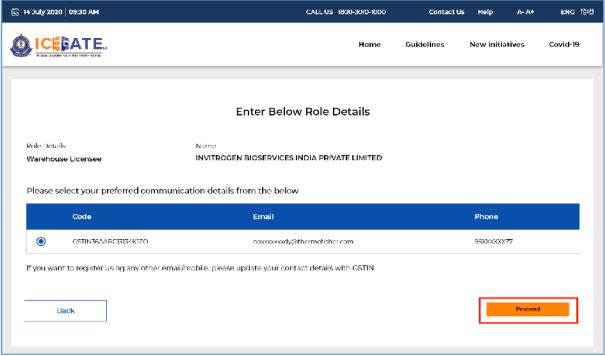
4.1.3 Select Role Detail
(a) On clicking <Proceed> button above, the system fetches the contact details available in GSTN records. The user will have to select the radio button and click on <Proceed> button. These contact details would be used for authenticating all the transactions and communications in ICEGATE.
4.1.4 Verification of User Details
(a) On clicking the <Proceed> button, the system will display the following screen to verify the selected Phone Number and email ID.
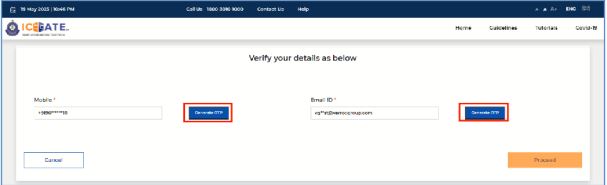
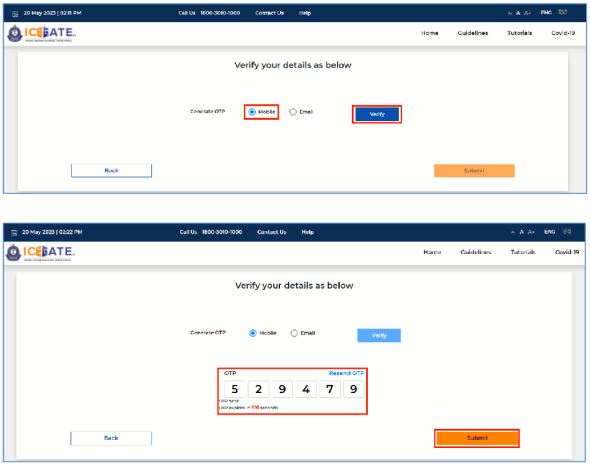
4.1.4.1 Verification of Mobile Number
(a) For authenticating the mobile number, the user should click on the <Generate OTP> button under the 'Mobile' option. A six-digit OTP will be generated and sent to the user's mobile number.
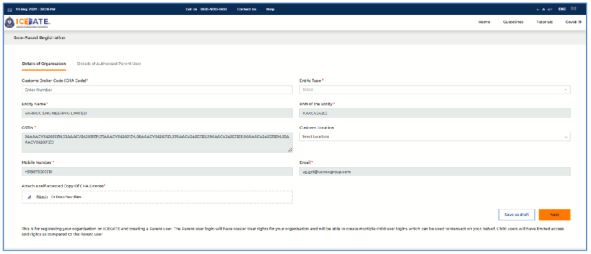
(b) If the OTP is invalid, an Error message will be displayed.
(c) In case of not receiving the OTP verification code, click on <Resend OTP> as displayed in the screen below.
(d) The user should validate the received OTP within a set interval of 600 seconds. Else, the OTP will expire.
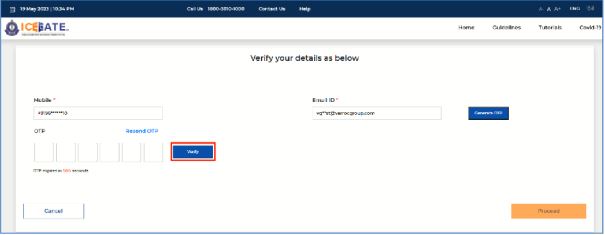
(e) On successful verification of OTP, the system will display the message "Mobile Verified" on the screen and a check mark will appear next to the Mobile field.
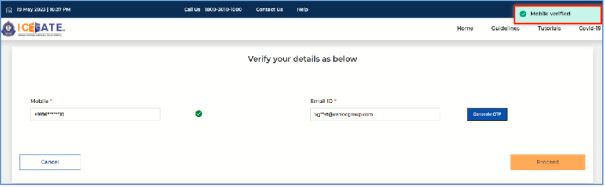
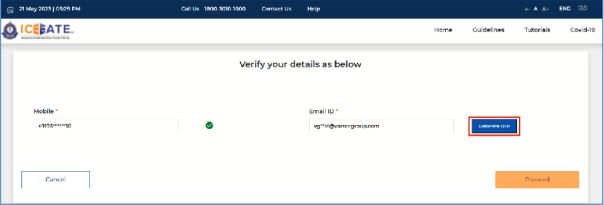
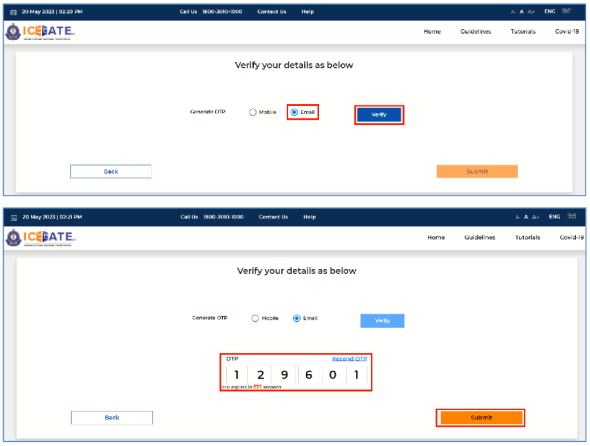
4.1.4.2 Verification of Email ID
(a) Similarly, on clicking the <Generate OTP> button against the Email ID, a sixdigit OTP would be generated and sent to the user's email address.
(b) If the OTP is invalid, an error message would be displayed.
(b) In case of not receiving the OTP verification code, the user should click on <Resend OTP> option as displayed in the screen below.
(c) The user should validate the received OTP within a set interval of 600 seconds.Else, the OTP will expire.
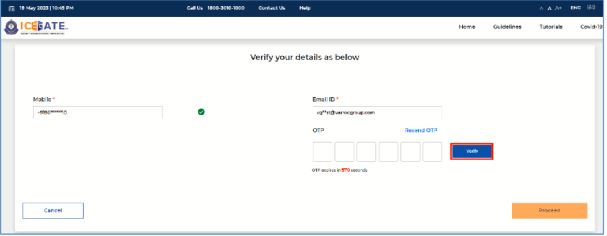
(d) On successful verification of OTP, the system will display the message "Email Verified" on the screen and a check mark will appear next to the Email field.
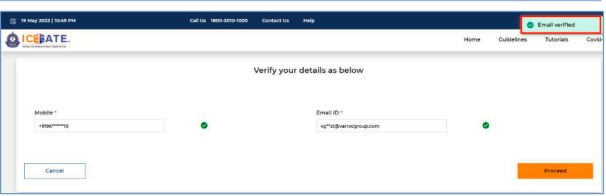
(e) Click on the <Proceed> button.
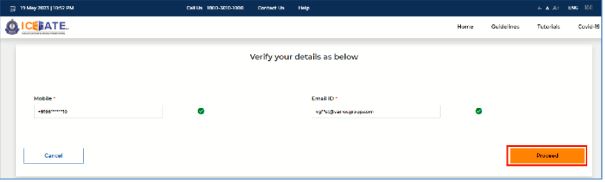
4.1.5 Generation of Reference ID
(a) After OTP validation is completed, click on the <Proceed> button, the system will generate a Reference ID along with its expiry date (valid for 15 days).
(b) In case the user does not complete the remaining steps within the expiry date, the process of generation of Reference ID will need to be performed again.
(c) The system will send the generated Reference ID to the registered Email ID of the user.
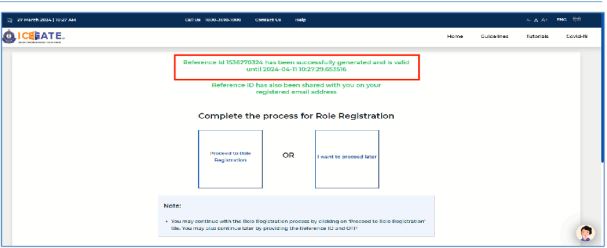
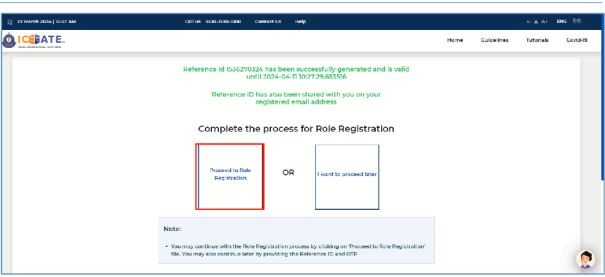
4.1.6 Process for Role Registration
(a) After completing the previous step, the users will have two options to complete the role registration process on ICEGATE -
i. The user can continue with the Role Registration process by clicking on 'Proceed to Role Registration' button.
ii. The user can continue the role registration process later by clicking the 'I want to proceed later' button.
(b) Whenever the user needs to proceed with the process of registration, he/she will have to select the option 'Continue using Reference ID' as shown in para 7.2 of this advisory. The system will ask the Reference ID and authenticate the user using OTP on email/mobile.
4.1.6.1 Proceeding to Role Registration
(a) To continue the process of role registration, the user needs to click on the 'Proceed to Role Registration' option and the system will display the following screen
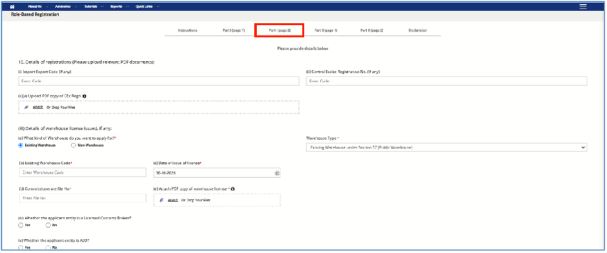
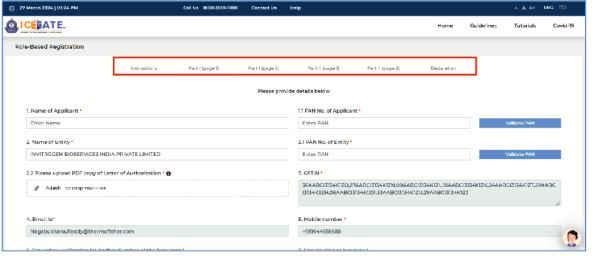
4.1.6.2 Role Registration Form
(a) On selecting the above option, the system will display the role registration form to be filled by the user. The displayed form has six segments namely:
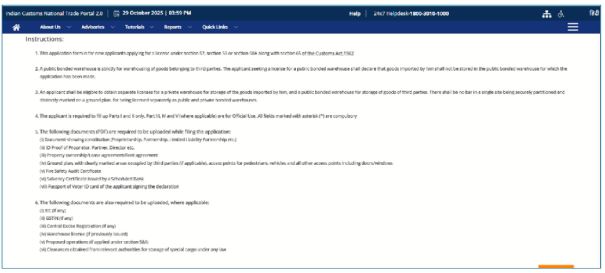
i. Instructions
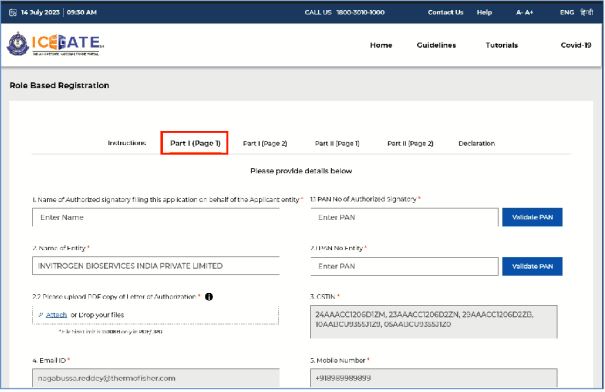
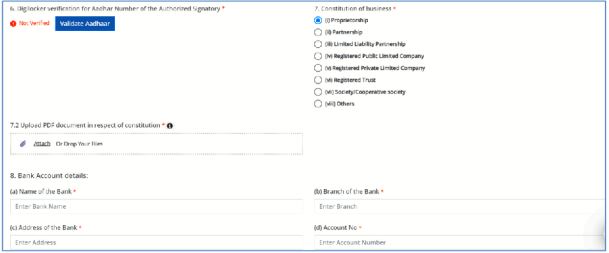
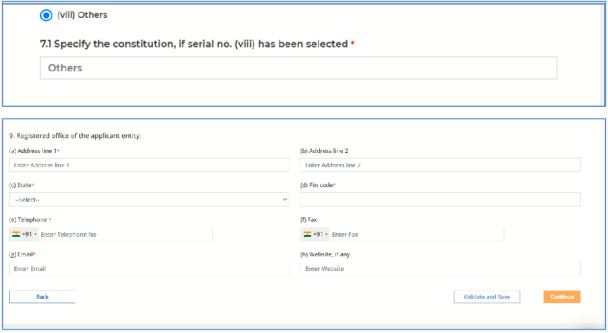
ii. Part I (page 1)
iii. Part I (page 2)
iv. Part Il (page 1)
v. Part Il (page 2)
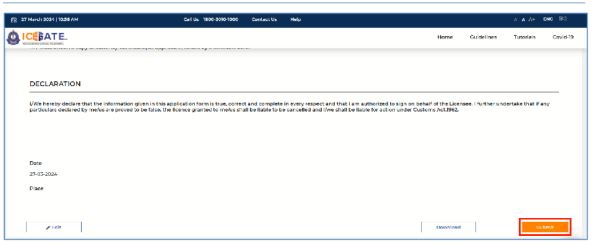
vi. Declaration
(b) The user will have to provide the details of all mandatory fields (*) in both the Segments and upload necessary documents.
(c) Click on <Continue> button.
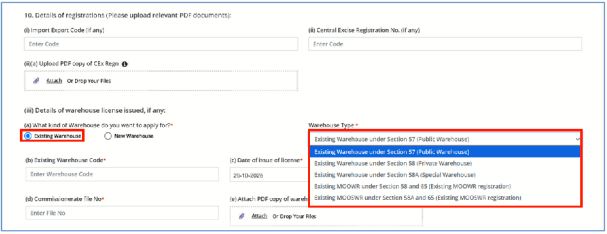
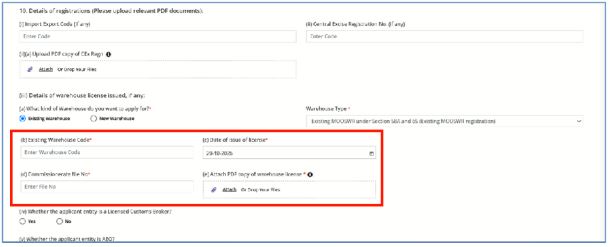
4.1.6.2.1 For Existing Warehouse User
If the user has an existing warehouse code, the following options under the "Warehouse type" dropdown will be visible to the user. The user will be required to select the appropriate type of warehouse.
(i) Existing Warehouse under Section 57 (Public Warehouse)
(ii) Existing Warehouse under Section 58 (Private Warehouse)
(iii) Existing Warehouse under Section 58A (Special Warehouse)
(iv) Existing MOOWR under Section 58 and 65 (Existing MOOWR registration)
(v) Existing MOOSWR under Section 58A and 65 (Existing MOOSWR registration)
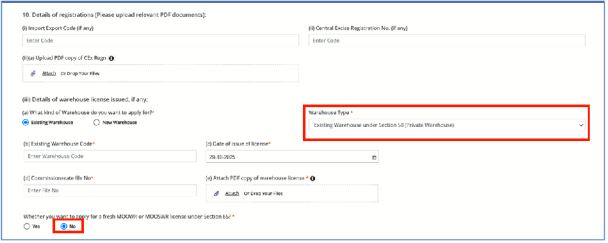
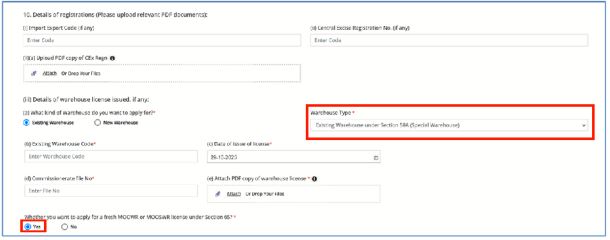
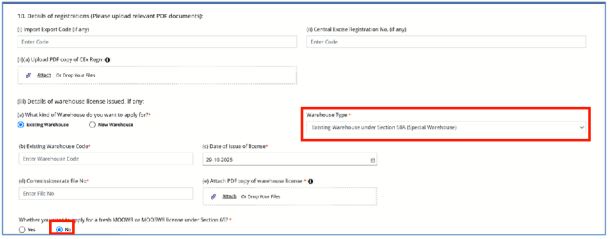
If the user selects the warehouse type 'Existing Warehouse under Section 58 (Private Warehouse)' from the above dropdown, the system will enable an additional mandatory field prompting the user to confirm (Yes/No) whether they wish to apply for a fresh MOOWR or MOOSWR license under Section 65, or they do not wish to apply.
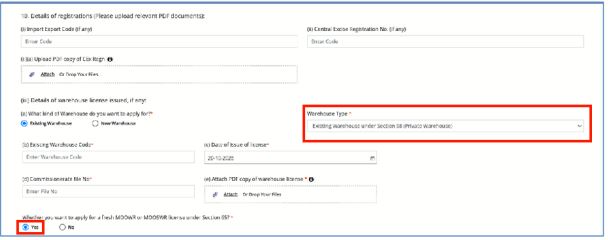
When the user selects 'Yes', the system will automatically choose the type of warehouse licence that the user wishes to apply i.e. option (d) 'MOOWR (Section 65)' at serial number 5 in Part Il (page 1), and all other options will be disabled by default, as shown in the screen below

When the user selects 'No', then the user will move to the next step-
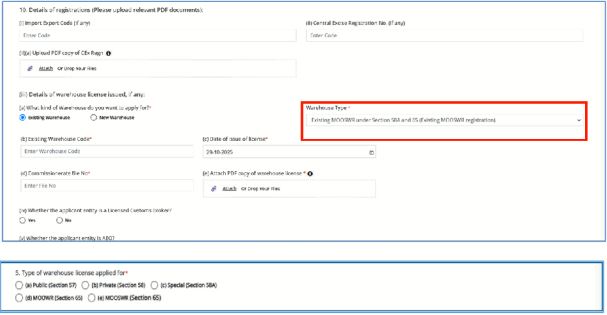
If the user selects the warehouse type 'Existing Warehouse under Section 58A (Special Warehouse)' from the dropdown, the system will enable an additional mandatory field prompting the user to confirm whether they wish to apply for a fresh MOOWR or MOOSWR license under Section 65, or they do not wish to apply.
When the user selects 'Yes', the system will automatically choose the type of warehouse license that the user wishes to apply i.e. option (e) 'MOOSWR (Section 65)' at serial number 5 in Part Il (page 1), and all other options will be disabled by default, as shown in the screen below

When the user selects 'No', then the user will move to the next step-
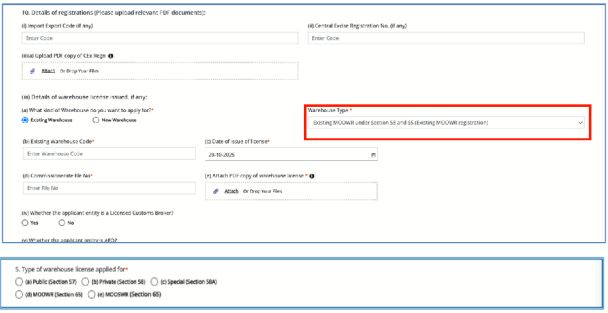
When the user selects the highlighted option from the 'Warehouse Type' dropdown, they will be able to apply any type of warehouse license, as displayed at serial number 5 in Part Il (page 1) in the screen below
When
the user selects the highlighted option from the 'Warehouse Type' dropdown,
they will be able to apply any type of warehouse license, as displayed at
serial number 5 in
Part Il (page 1) in the screen below
The system will ask the user to enter the details - 'Exiting Warehouse Code' 'Date of Issue of License', 'Commissionerate file number', and 'Upload PDF copy of the warehouse license' (maximum file size allowed to upload is 1.5 MB). These details will be validated at ICE-GATE.
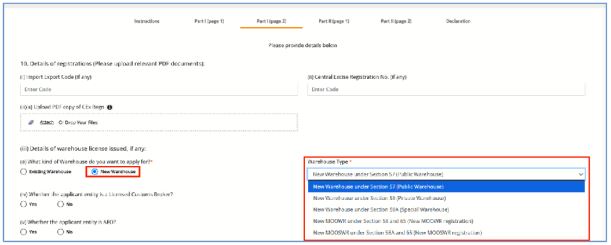
4.1.6.2.2 For Applying a New Warehouse
If the user has a new warehouse code, the following options under the "Warehouse type" dropdown will be visible to the user as listed below. The user will be required to select the appropriate type of warehouse.
(i) New Warehouse under Section 57 (Public Warehouse)
(ii) New Warehouse under Section 58 (Private Warehouse)
(iii) New Warehouse under Section 58A (Special Warehouse)
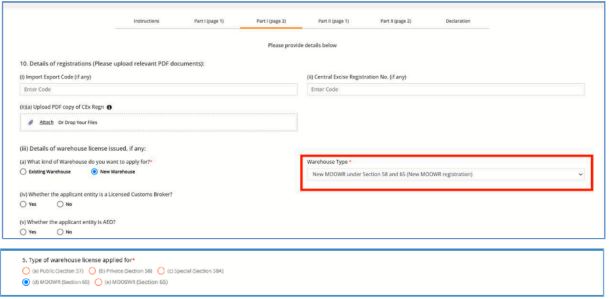
(iv) New MOOWR under Section 58 and 65 (new MOOWR registration)
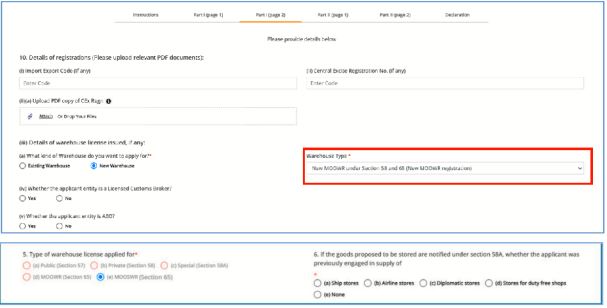
(v) New MOOSWR under Section 58A and 65 (new MOOSWR registration)
When the user selects the highlighted option from the 'Warehouse Type' dropdown, the system will automatically choose the type of warehouse license that the user wishes to apply i.e. option (d) 'MOOWR (Section 65)' at serial number 5 in Part Il (page 1), and all other options will be disabled by default, as shown in the screen below
When the user selects the highlighted option from the 'Warehouse Type' dropdown, the system will automatically choose the type of warehouse license that the user wishes to apply i.e. option (e) 'MOOSWR (Section 65)' at serial number 5 in Part II (page 1), and all other options will be disabled by default, as shown in the screen below
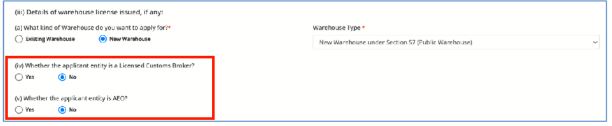
Afterwards, the system will prompt the user to select the appropriate option, as highlighted in the screens below.
If the user selects the option "Yes',
If the user selects the option "No"

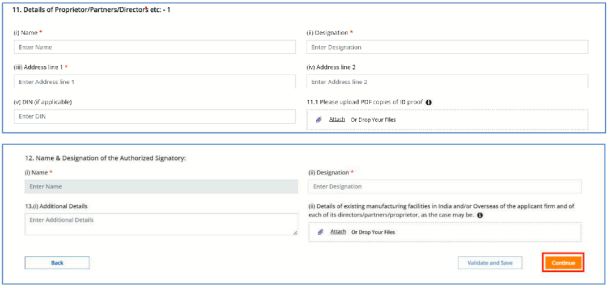
The user will be required to fill in and complete the form details, which will be displayed in the screens below
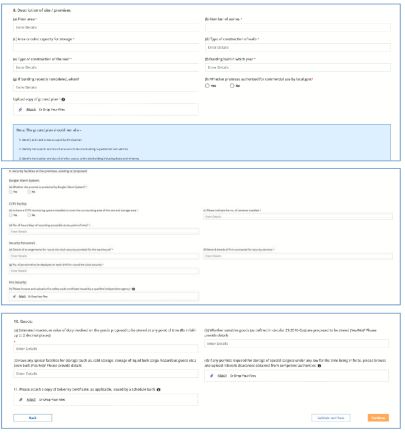
Please note that the boundaries of the warehouse, mentioned in point number 3 in the screen below, should be specified in either meter or feet.

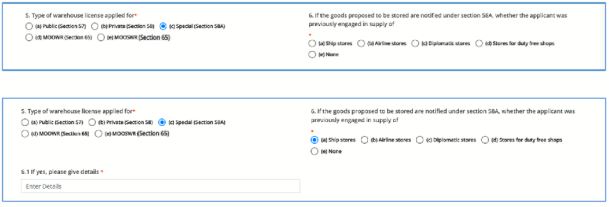
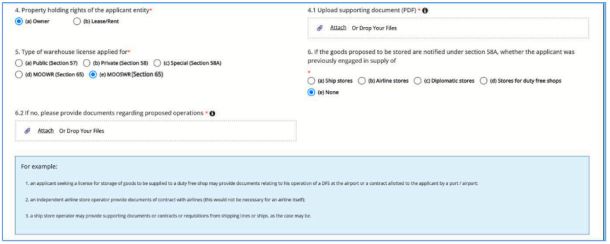
Note: Point 6 will only be displayed if the user selects the option (c) "Special (Section 58A)".
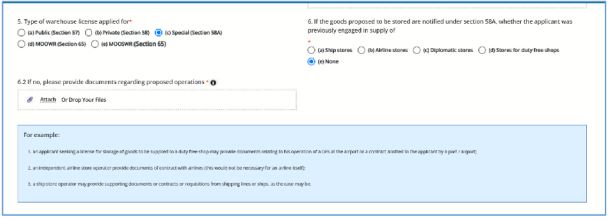
Note: Point 6.2 will only be displayed if the user selects the option (c) "Special (Section 58A)" >> Option" (e) None'.

Note: Point 6.1 will only be displayed if the user selects the option (e) MOOSWR (Section 65) >> Option" (a) Ship stores".
Note: Point 6.2 will only be displayed if the user selects the option (e) MOOSWR (Section 65) >> Option" (e) Nones".
Please note that the user must enter the item description in the provided box and input the 8-digit HSN classification code on the screen below

Please note that the floor area of the warehouse, mentioned in point number 8(a) in the screen below, should be specified in either square feet or square meters.
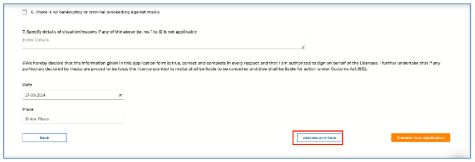
Click on <Continue> button.
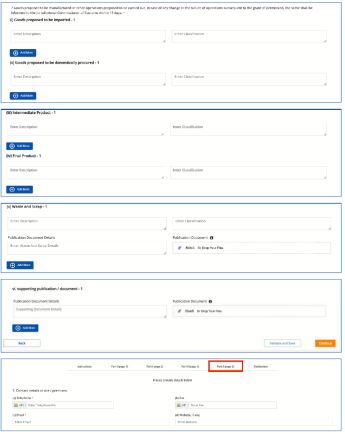
The user can validate and save the filled form by clicking on "Validate and Save" button. User can preview the filled application before submission using "Preview Your Application" button.
4.1.6.3 Form Submission
(a) On completion of filling of the form, the user needs to click on the <Submit> button for submission of the form.

(b) After completing the role-based registration successfully, the application would be forwarded to the approving authority of ICEGATE.
4.2 Continue using Reference ID
(a) If the user has an unexpired Reference ID, he can select the 'Continue using Reference ID' option and click on the <Continue> button for continuing the role selection or accessing the partially filled registration form as draft.
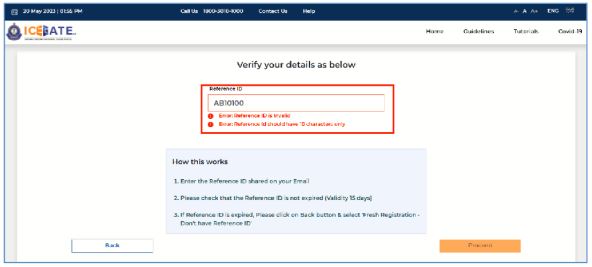
4.2.1 Verification of Reference ID
(a) On clicking the <Continue> button, the user needs to verify the Reference ID received on the registered email-id.
(b) If the entered Reference ID has expired, the user needs to click on <Back> button and select the "Fresh Registration- Don't Have Reference ID" option.
(c) If the entered Reference ID is invalid, Error message will be displayed.
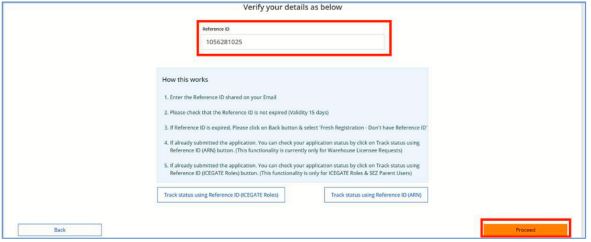
(d) If the entered Reference ID is valid and unexpired, the user shall be able to click on the proceed button.
4.2.2 Verification of Details using Mobile Number
(a) On clicking the <Proceed> button, the user must verify the registered mobile number.
(b) Select the 'Mobile' radio button and click on the <Verify> button. A six-digit OTP will be generated and sent to the user's mobile number.
(c) If the entered OTP is invalid, an error message would be displayed.
(d) If the OTP is not received, click on <Resend OTP> option.
(e) On clicking the <Submit> button, the system will display the registration from to be filled by the user.
4.2.3 Verification of Details using Email-ID
(a) On clicking the <Continue> button as enumerated in 7.3.1 , the user must verify the registered email ID.
(b) On clicking the <Submit> button, the system will display the registration form to be filled by the user.
(c) Kindly refer to the Section 4.1.6.2 to view the application form.
5. Track Query Status and Replay
(a) If the admin officer wishes to raise query, they can raise their query. In this case, user shall be notified of the query on email as well as their dashboard. User can respond to query via dashboard.
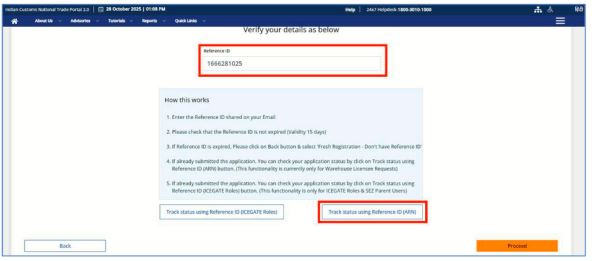
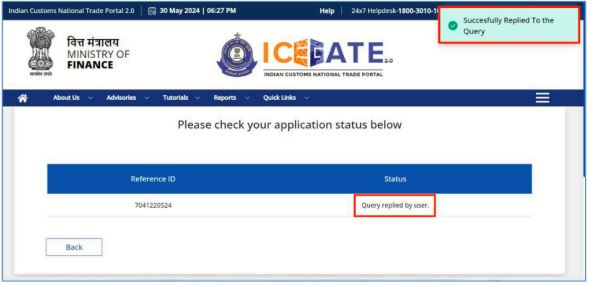
(b) The user can check the status of their request by providing reference ID and click on "Track Status using Reference ID" button.
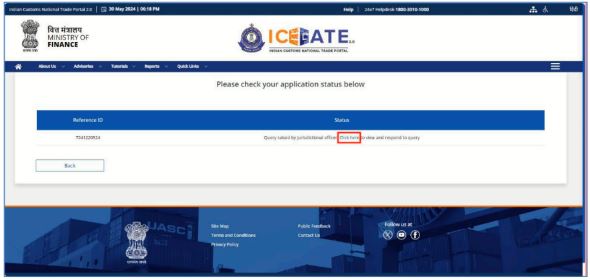
(c) When clicking the above button, the user will be redirected to a new page where he can track the status of the submitted request by clicking on the "Click here', link.
(d) On clicking the link above, the user will be redirected to a new page from where the user can view and respond to the query raised by the admin officer.
(e) The user can respond to the query raised by the admin officer in the following ways:
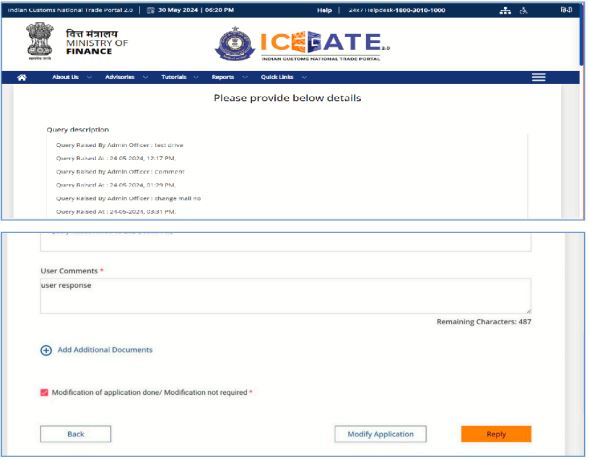
i. Click on the "Reply" button for Clarification/explanation on the query raised in text field.
ii. Click on the "Modify Application" button for correction in the information provided in any of the fields of the application form. In this case the user will be required to resubmit the application form.
iii. Click on "Add Supporting Documents" link for uploading of additional documents as may be required by the officer.
(f) In all the above three ways, the user will be required to provide a comment in the "User Comment" box. It is also mandatory to check on the statement 'Modification of application done/Modification not required'.
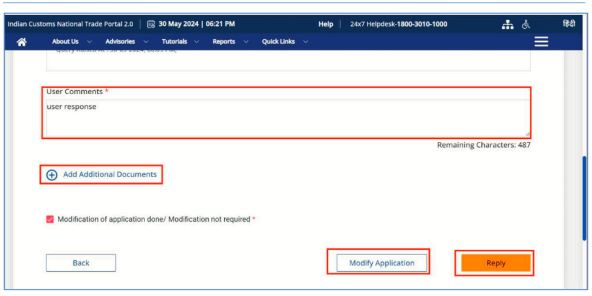
(g) On clicking the <Replay> button, the system will display a message _"Successfully Replied to the Query" and upon replying to the query, the status of the application will be changed to 'Query Replied by the User'.
(h) Once the user replies to the query, the request will be forwarded to the admin officers. Subsequently, as per the satisfaction of the Officer, he can approve or reject the user response.
6. Digi Locker Validation in the Warehouse Licensing Module.
it's all related to user awareness and how to register on Digi locker.
Kindly follow the steps below for Digi Locker registration:
Step 1: Go to the official website of Digi Locker.
Step 2: Click <Sign Up> on the top right of the page.
Step 3: Enter full name, mobile number, DOB (date of birth as per one's Aadhaar card), email ID, and 12-digit unique Aadhaar number in the given box.
Step 4: Press <Submit> button to proceed.
Step 5: An OTP (One Time Password) will be generated for the mobile number.
Make sure to provide the mobile number linked with your Aadhaar number. If the Aadhaar number is not linked with the mobile number, contact the nearest Aadhaar issuing agency to update the mobile number with the Aadhaar card.
Step 6: Enter the OTP and tap <Submit> to proceed further.
Once the OTP is verified, a tab will open to set a username and password for users.
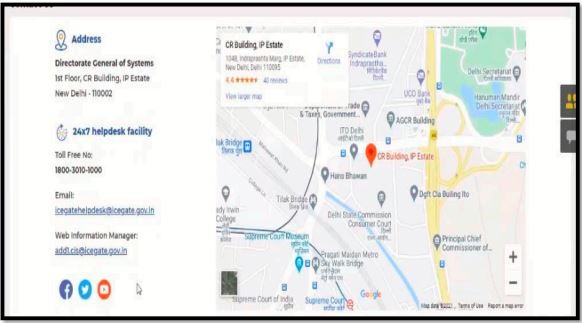
7. Contact Us
The contact details are as follows:
Pr. ADG, ICEGATE
Director General of Systems & Data Management, CBIC
1st Floor, CR Building, IP Estate,
New Delhi - 110 109
Toll Free No: 1800-3010-1000
The user can also drop their queries at:
Email: icegatehelpdesk@icegate.gov.in